

In a world obsessed with data and analytics, Google Tag Manager is a tool that brings order to the chaos. Web developers, SEO experts and marketing leaders depend on GTM to gain deep insights about user interactions without sacrificing page speed.
Web marketers use tags and tracking pixels – which typically come in the form of JavaScript snippets – to track data to and from a website and third-party services like Google Ads, Google Analytics, LinkedIn Insight, Salesforce and many others. GTM wrangles all of that information in a manner that requires almost no coding at all.
This guide will take you through the GTM account setup process all the way to publishing tags live on your site.
Why should my business use Google Tag Manager?
If your website uses a single tracking service, such as Google Analytics, there’s not much need to use GTM. You can simply paste the GA code into the pages on your site for which you want to track data. It’s when you begin to use multiple tracking services and third-party tools that the case for GTM becomes a no-brainer.
For instance, if your site is tracking data through GA as well as Google Ads and Facebook Pixel, you’ll need three separate code snippets on every page. Not only is adding tags manually time consuming, it leaves your site tracking susceptible to bugs. For instance, if your site HTML changes, tags can break, requiring someone to go in and manually correct the mistakes.
But even if your tags are all functioning properly, you may still run into another problem: decreasing page speeds. Bloated blocks of JavaScript can make your pages load slowly. And because Google uses page speed as a ranking factor, your pages will sink in search result pages.
With GTM, you only need to place a small amount of code on your pages, thereby preserving precious page speed.
Key concepts to understand
For the uninitiated, GTM can seem complicated. However, once you grasp the basics, you’ll see why analytics professionals across the web prefer to use it over manual tag management.
Here are a few concepts get familiar with: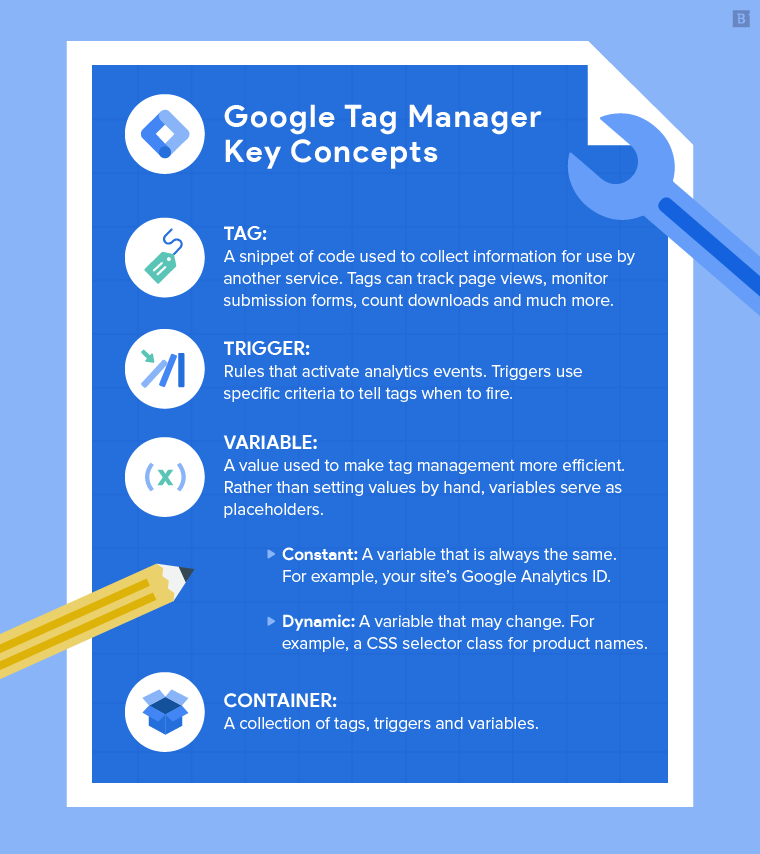
- Tag: A snippet of code used to collect information for use by another service. Tags can track page views, monitor submission forms, count downloads and much more.
- Trigger: Rules that activate analytics events. Triggers use specific criteria to tell tags when to fire.
- Variable: A value used to make tag management more efficient. Rather than setting values by hand, variables serve as placeholders.
- Constant: A variable that is always the same. For example, your site’s Google Analytics ID.
- Dynamic: A variable that may change. For example, a CSS selector class for product names.
- Container: A collection of tags, triggers and variables.
If you’re still feeling a little lost, don’t worry. Work through the steps below and refer back to these definitions if you get stuck.
Subscribe to
The Content Marketer
Get weekly insights, advice and opinions about all things digital marketing.
Thanks for subscribing! Keep an eye out for a Welcome email from us shortly. If you don’t see it come through, check your spam folder and mark the email as “not spam.”
Getting started with Google Tag Manager
Set up your Google Tag Manager Account
1. While logged into your Google account, visit the Tag Manager site.
2. Click “Create Account,” then set up an account name and specify your country.
3. Under “Container Setup,” create a unique container name – it’s best practice to use your domain name.
4. Finally, specify where your container will live. Choose “Web” if you’re working with a website, “iOS” or “Android” if you’re working with a mobile site, or “AMP” if you’re specifically working with Google’s Accelerated Mobile Pages.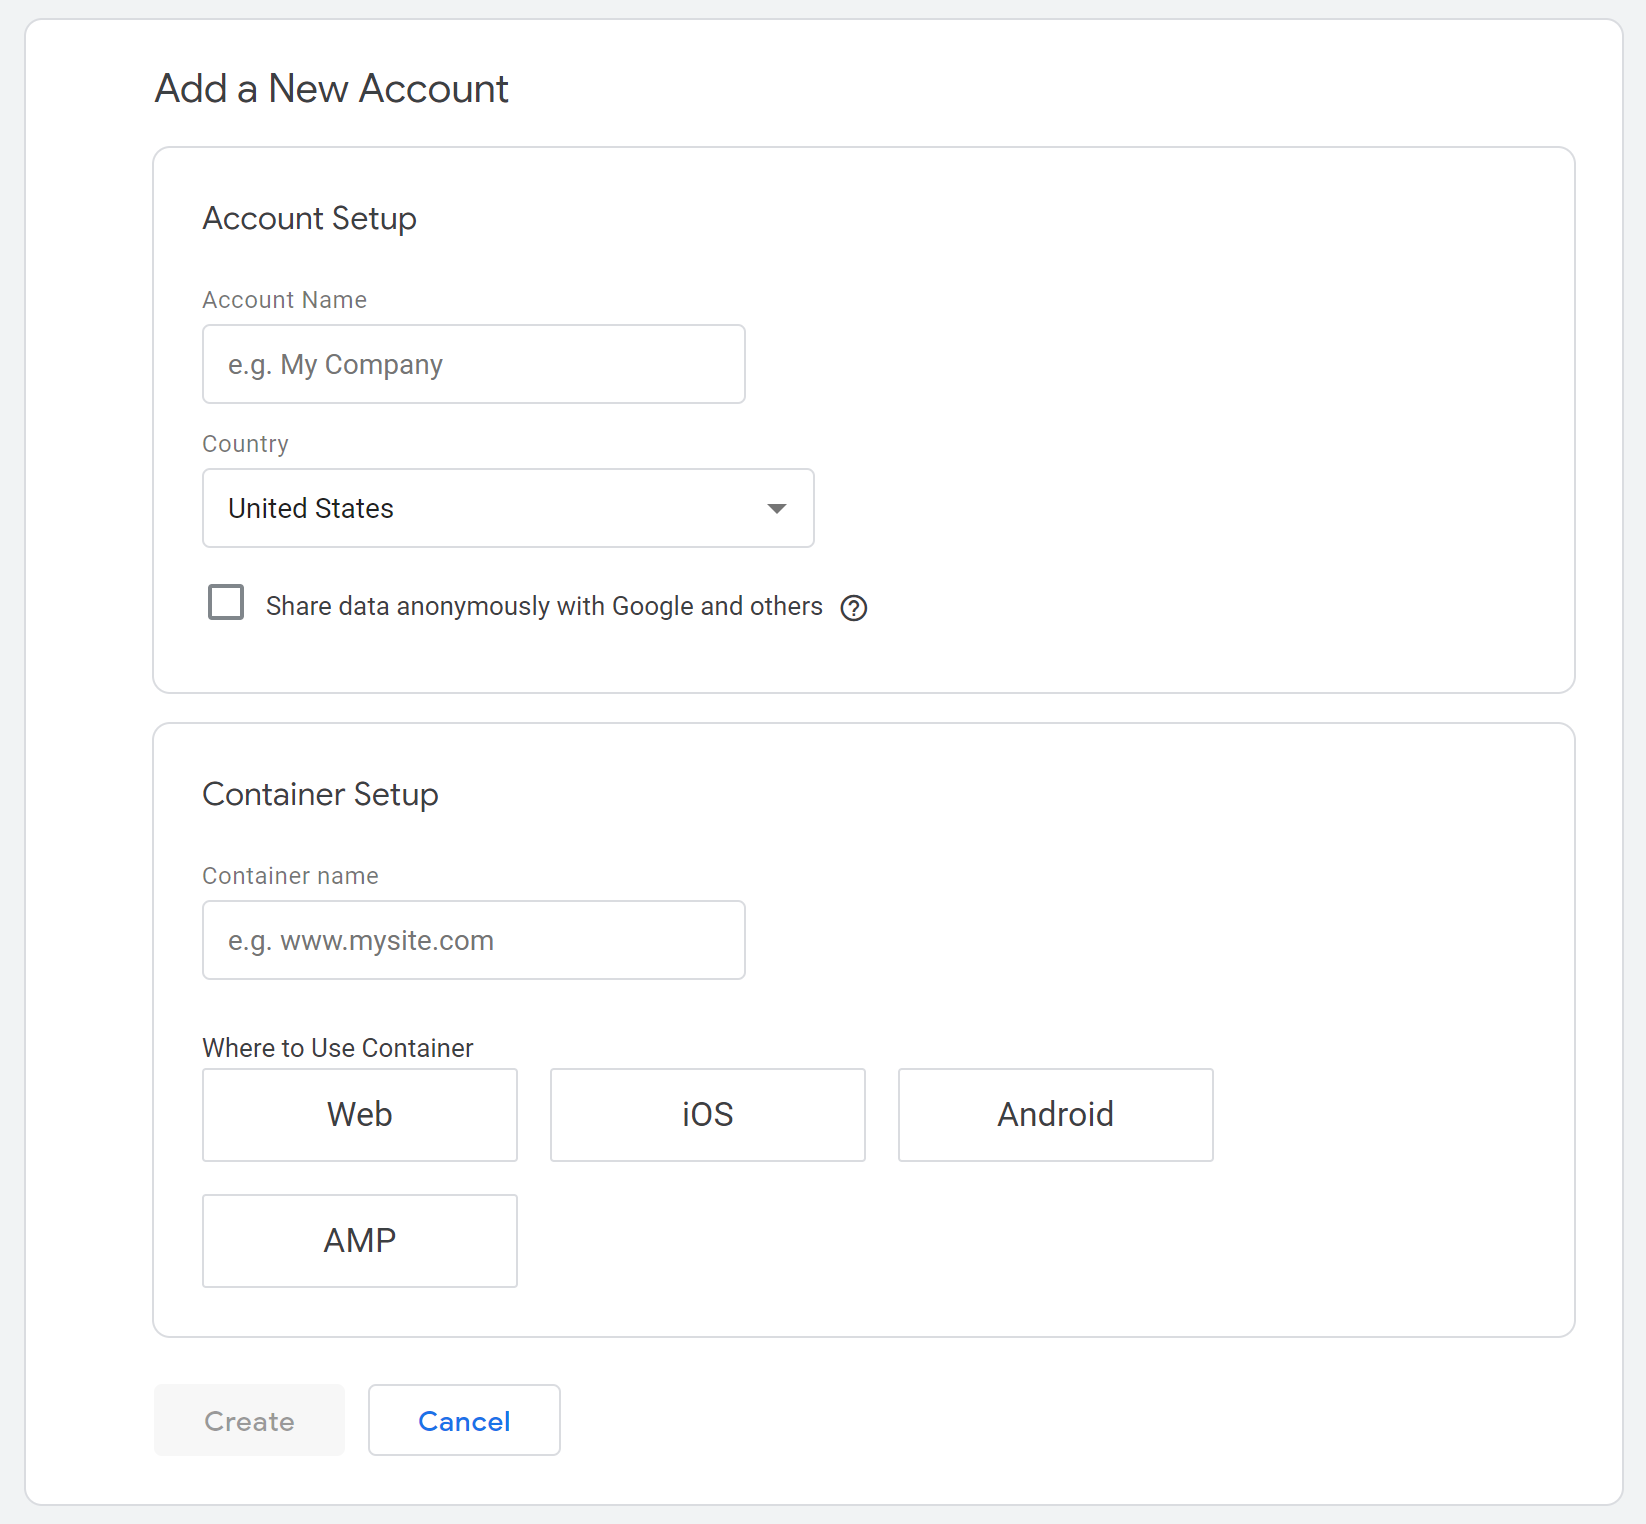
Install Google Tag Manager on your site
1. When you create your account, a pop-up will appear with code you need to paste onto every page of your website. If you need to find this information again, go to Admin > Install Google Tag Manager.
2. Copy all of the code from the first box, and paste it as high as possible in the <head> tag of every page on your site.
3. Copy all of the code from the second box, and paste it immediately after the opening <body> tag on each page.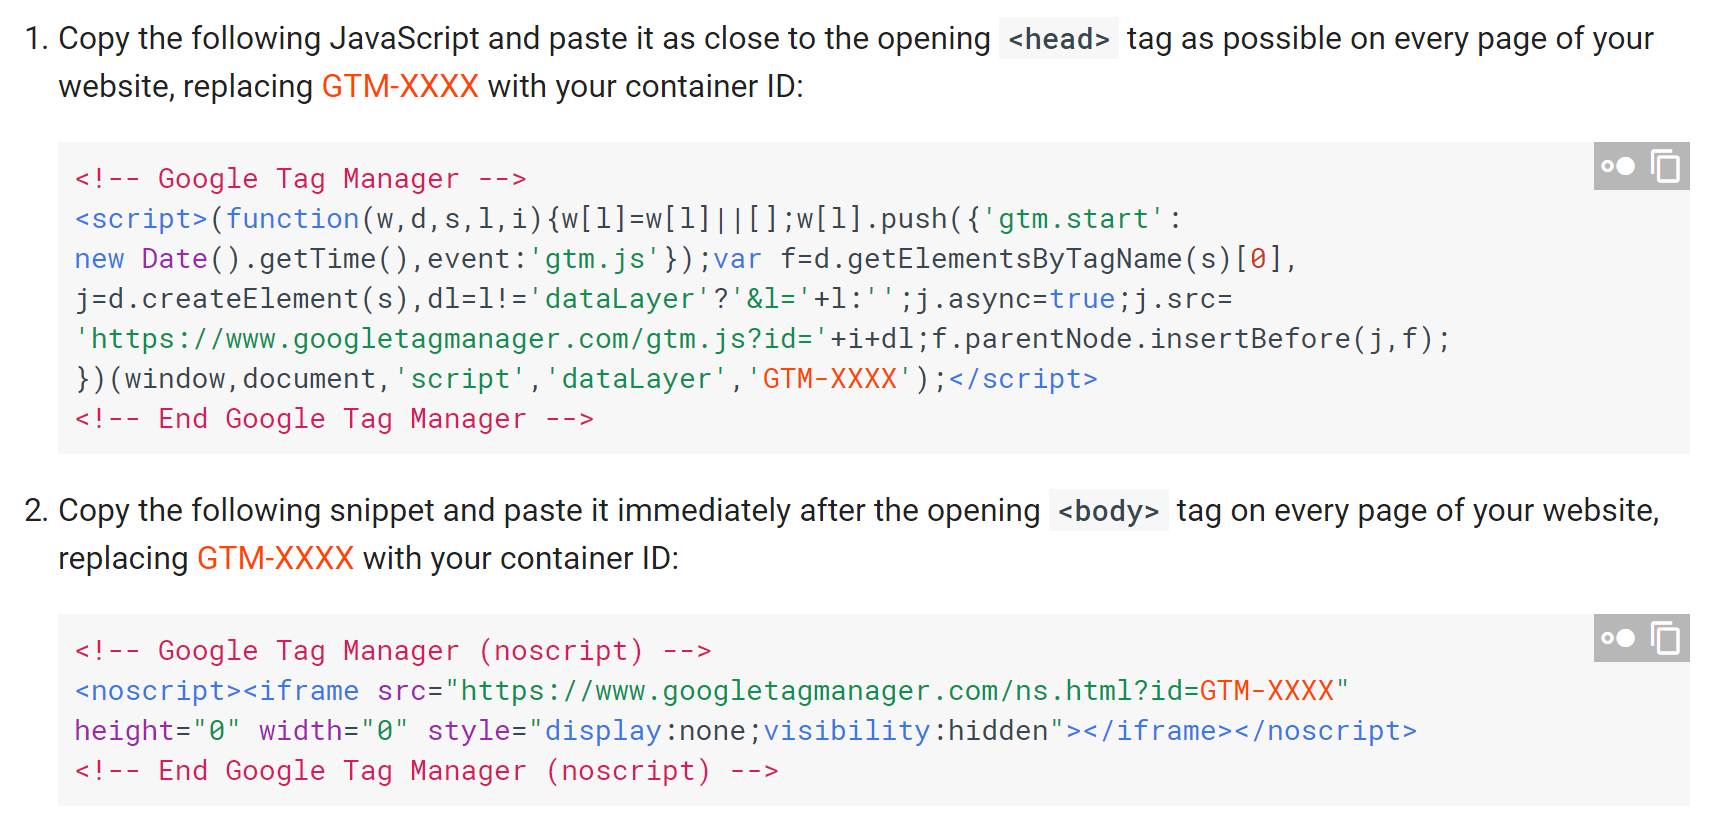
Set up a tag
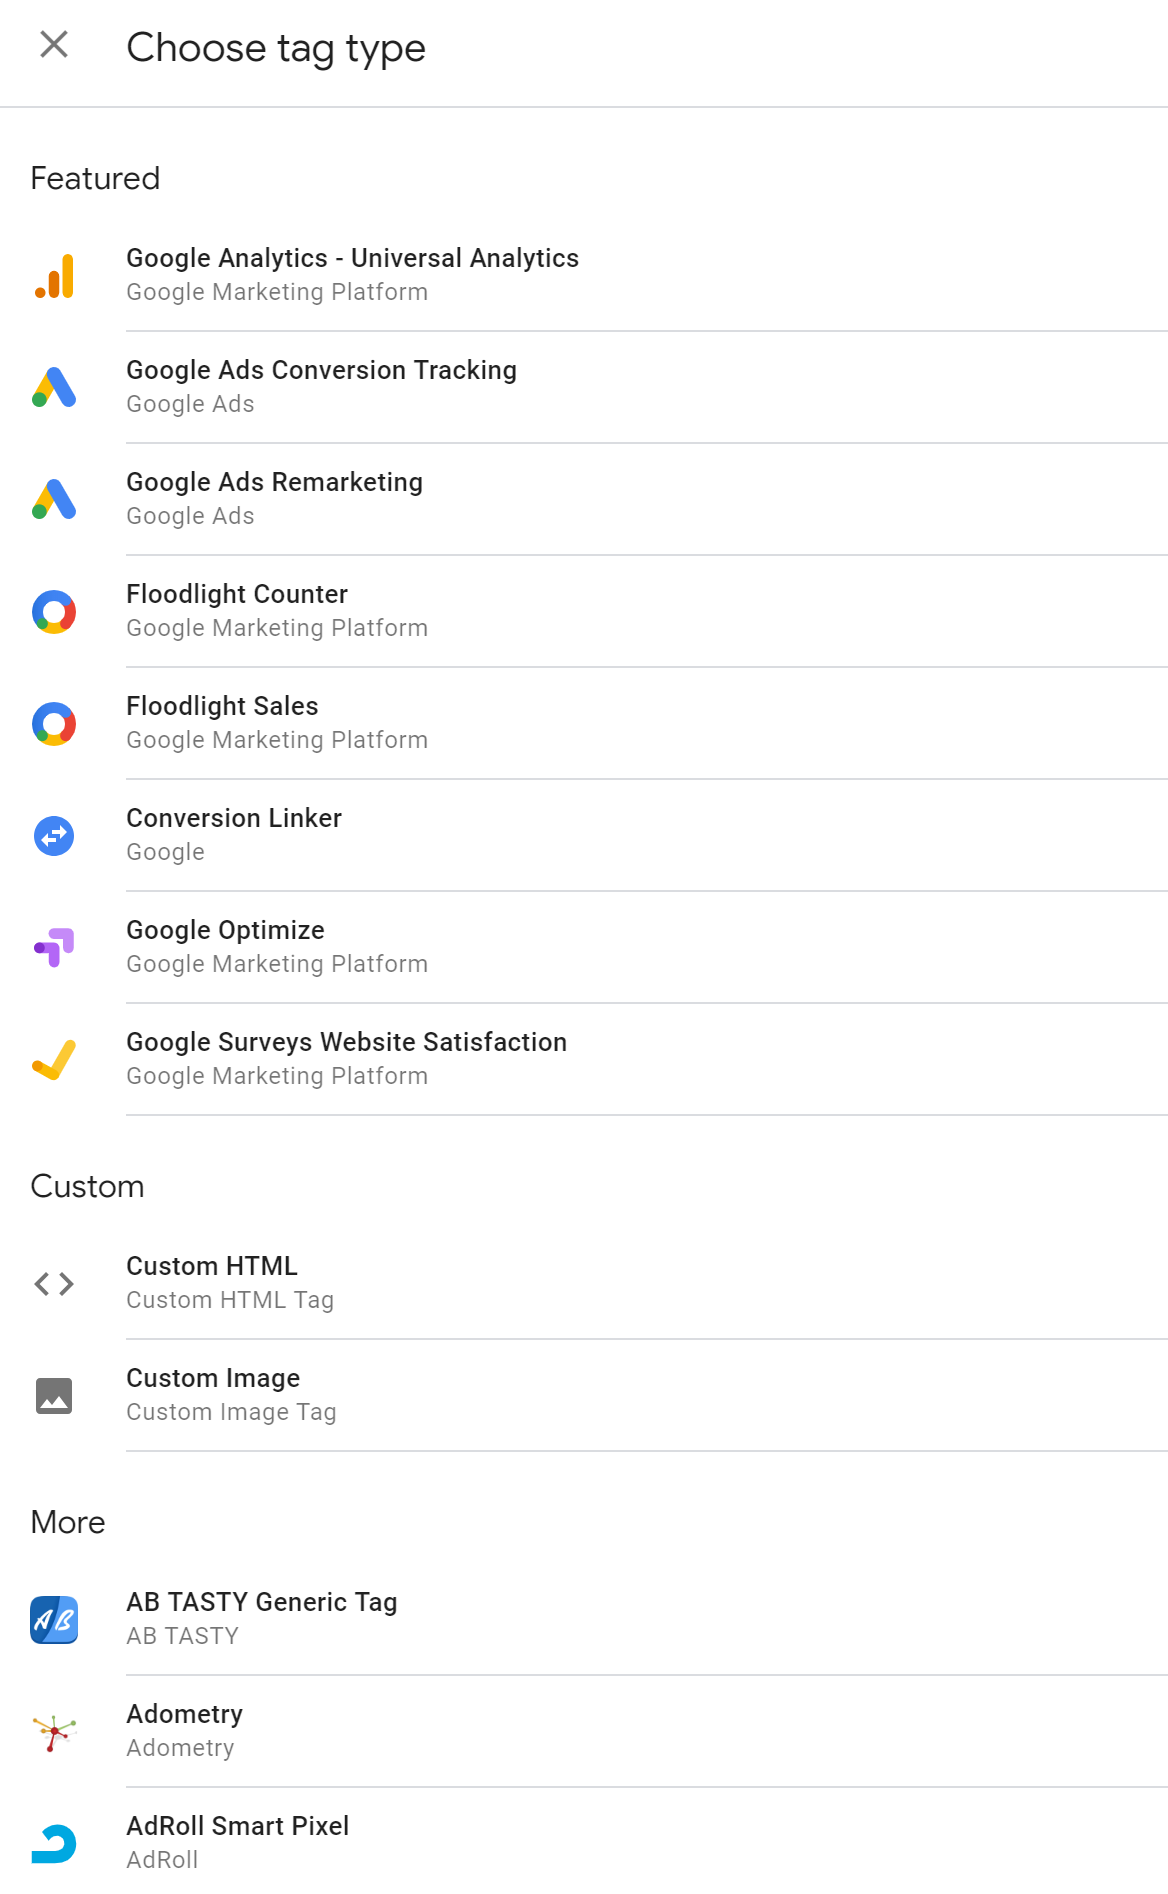
1. From your workspace, click “Add a new tag.”
2. Click the “Tag Configuration” icon, then select at tag type.
- You’ll see a list of more than 50 tag templates to choose from. For this tutorial, we’ll use the Google Analytics – Universal Analytics tag type.
- If you don’t see the template you need – Google doesn’t provide a template for Facebook Pixel, for example – you can create a custom tag type using HTML.
3. You’ll now be able to select options for your tag. For example, the Google Analytics tag template allows you to select different types of tracking, including page views, events, transactions, social interactions and many others. Each type may have its own set of parameters.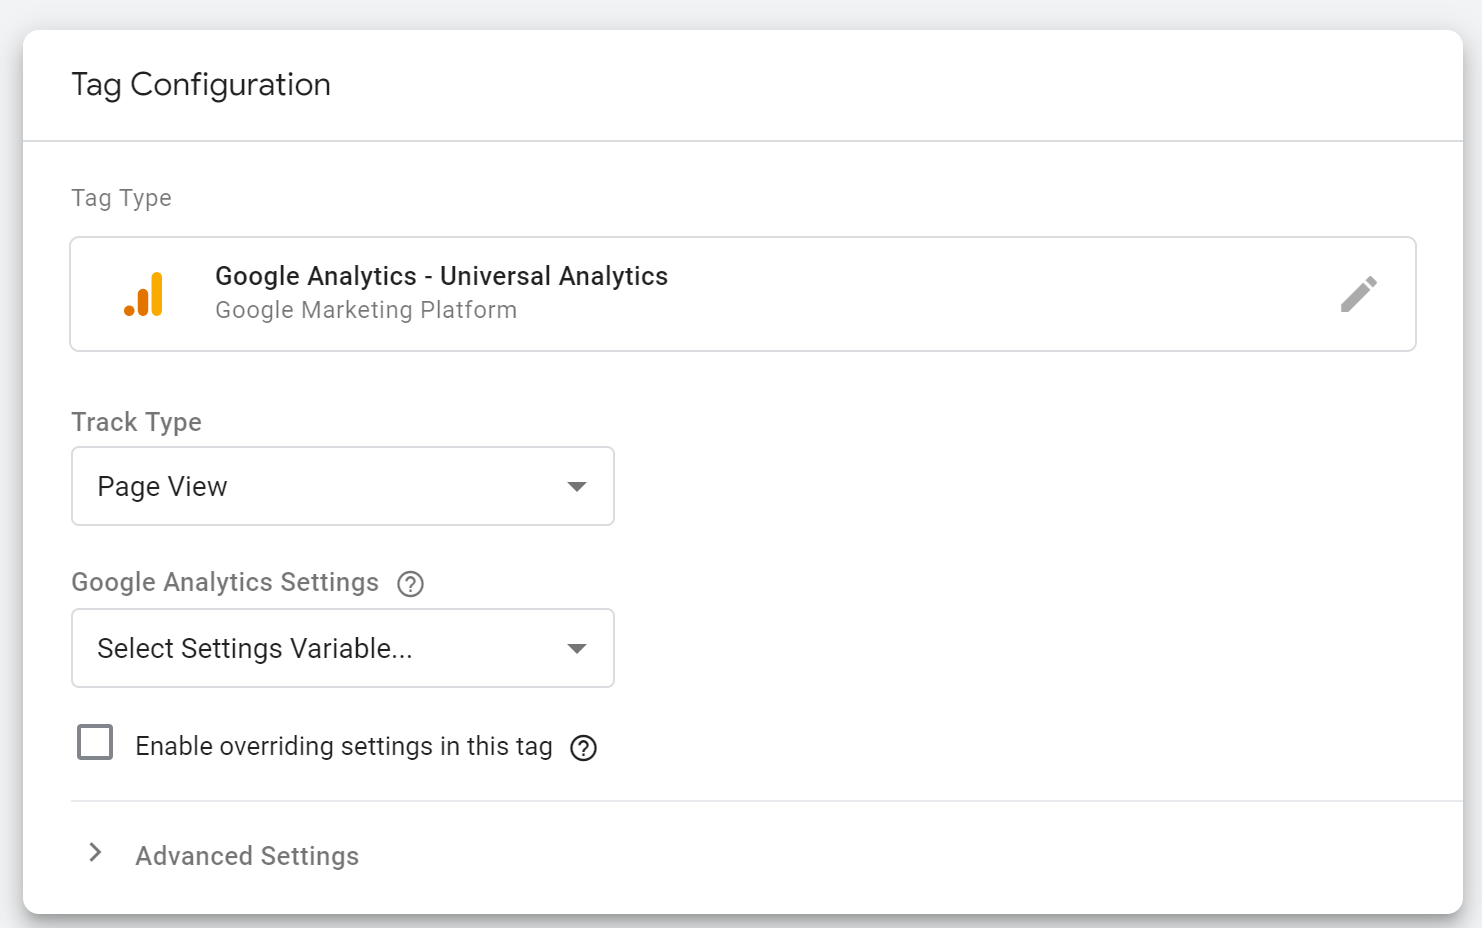
4. Create a settings variable. This will allow you to scale your tags by creating rules that can be applied to other tags. If you don’t have any variables yet, check the box labeled “Enable overriding settings in this tag.”
- For our example, we’ll need to add our Google Analytics Tracking ID to ensure our data comes through properly.
5. Under “Advanced Settings,” you can specify the tag’s firing priority by entering a value. The higher the value, the higher the priority.
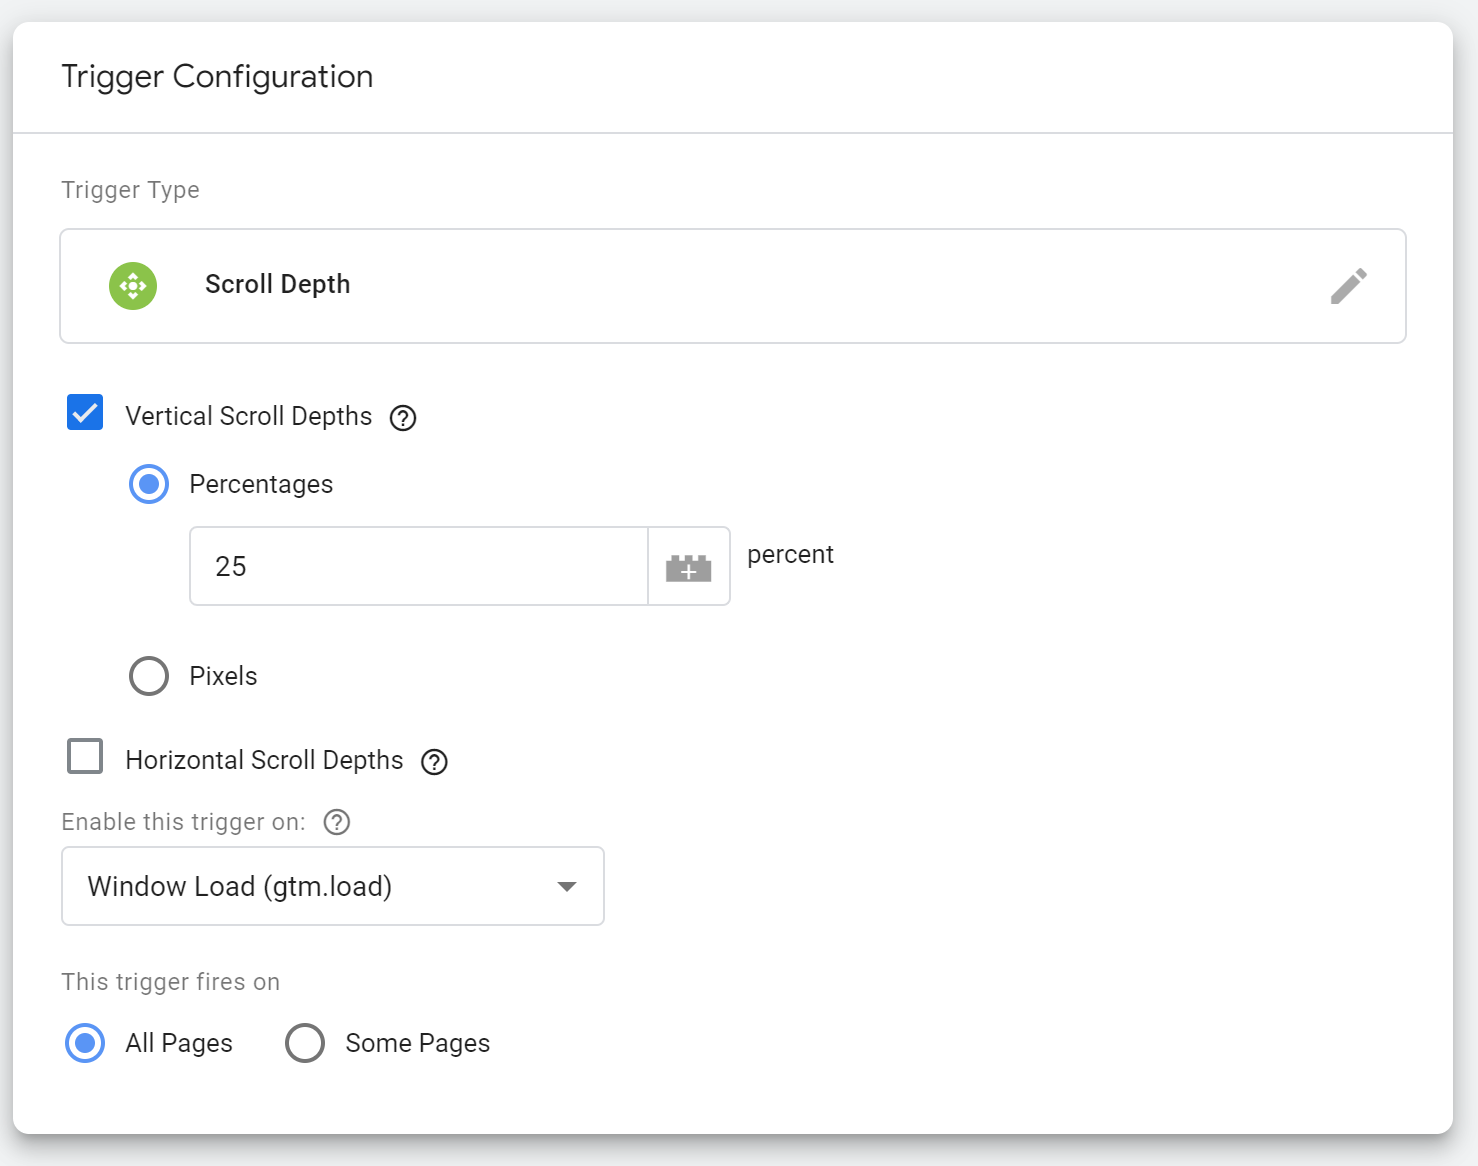
6. Click on the “Triggering” icon. Select a trigger that will tell your tag when to fire.
- For our example, the “All pages” trigger is the simplest. It fires whenever a user views a page where we have installed GTM.
- To create a custom trigger, click “Trigger Configuration,” then select a trigger type. For instance the “Scroll Depth” trigger will only fire the tag when users view a specified amount of the page.
7. With your tag and triggers configured, give your tag a unique title and click “Save.”
Preview your container
1. Once you’ve created your tags, you’ll need to test them to make sure they work properly. Click the “Preview” button at the top of your workspace.
2. Your workspace is now in Preview Mode. Open your website in a new tab and start testing your triggers. A debug mode pane should appear to help you troubleshoot any issues. If you set up the page-view tag and trigger, you should see the tag firing as you visit the pages on your site.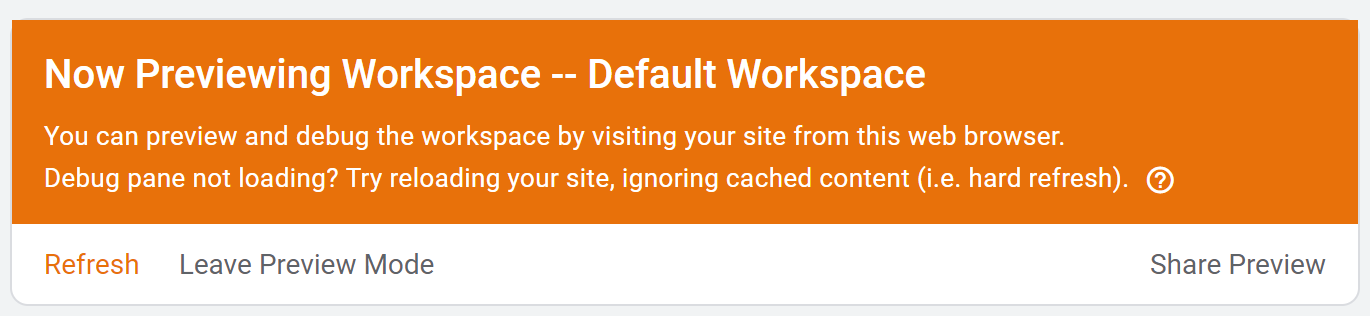
Publish and create a container version
1. Once you’ve verified that all of your tags work, exit Preview Mode.
2. Click the “Submit” button at the top of your workspace. Name the current version of your container and include a detailed description. When you’re finished, click “Publish.”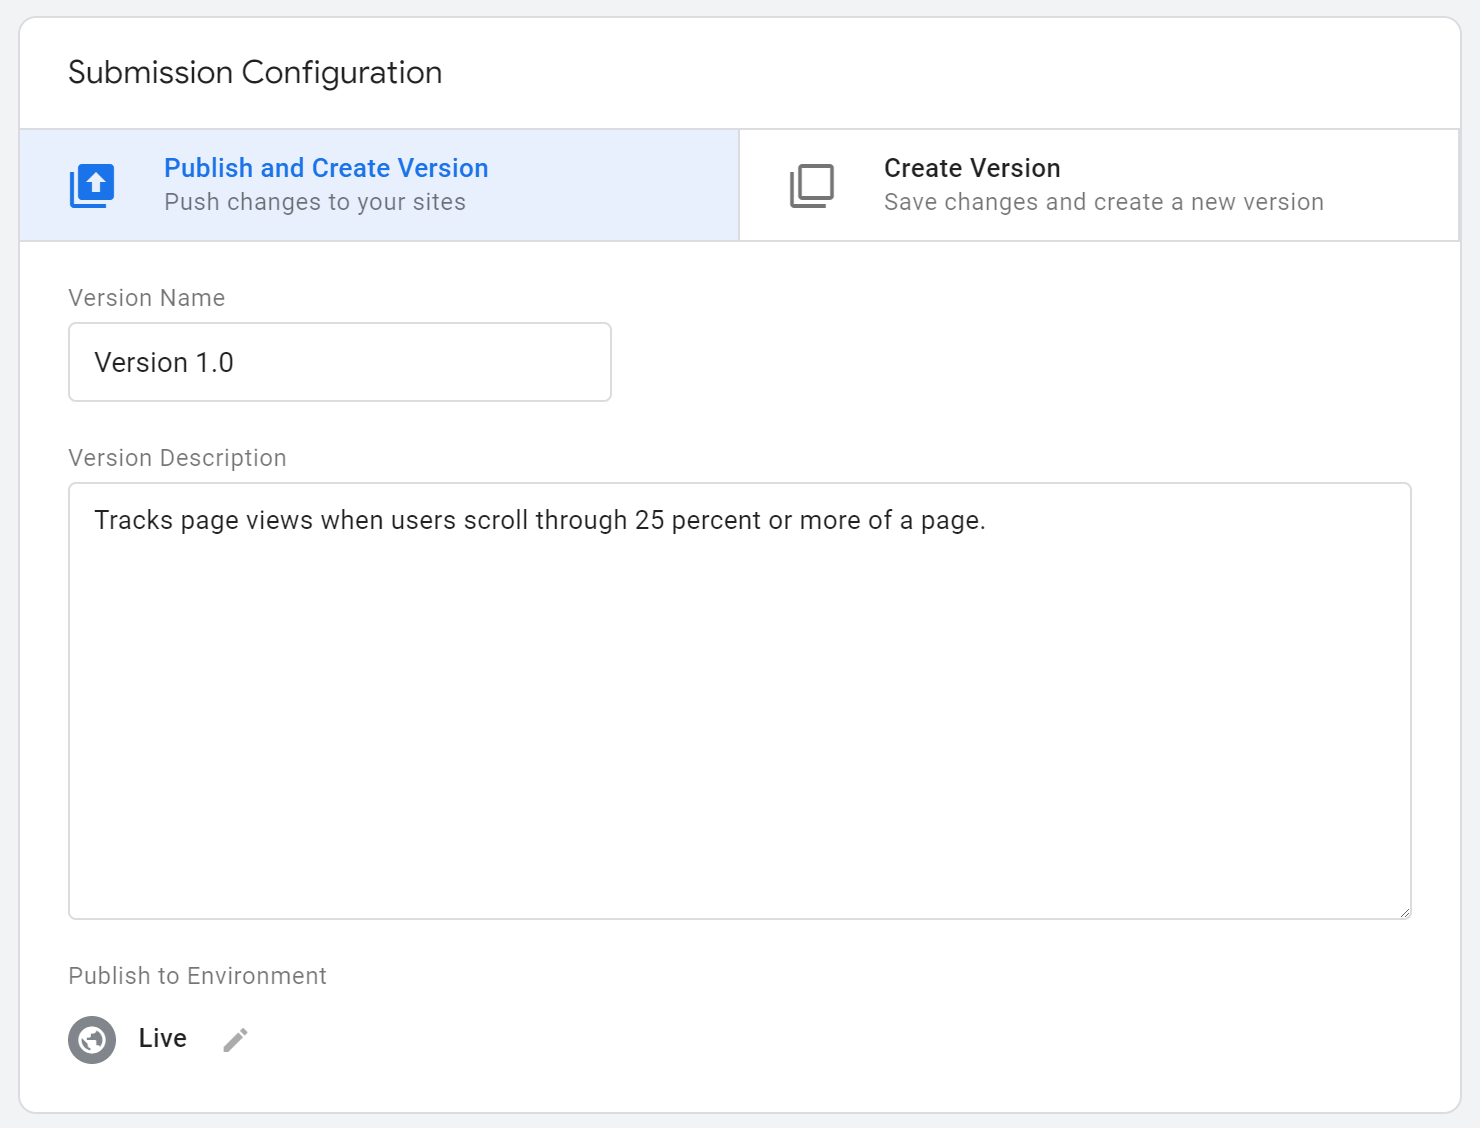
Avoiding duplicate data in Google Analytics
If you’re new to GTM, but your site already uses Google Analytics, you’ll need to delete the GA code from every page on your site. Remember, the GTM code snippets contain everything you need. So if you also have a dedicated GA snippet on your site, each GA tag will effectively fire twice.
Here’s what to do if you already run GA on your site:
1. Delete all GA code from your site.
2. Ensure GTM is installed correctly on your site (see above).
3. In GTM, go to Variables > User-Defined Variables > New > Utilities > Constant and type in your GA tracking ID. Name your variable and click save.
- Note: To find your GA ID, sign into your account and go to Admin > [Account Name] > [Property Name] > Tracking Info > Tracking Code.
4. Add this variable to any GA tag you create.![]()
Integrating Google Tag Manager and WordPress
It’s easy to integrate GTM and your business’s WordPress site. With your GTM account set up, navigate to Admin > Install Google Tag Manager and copy the code snippet from the bottom box. Paste this code below the <body> tag on every page of your WordPress site.
If you have a large number of pages on your site, and you have a business-level WordPress account, you can skip the manual process of injecting code into each page by using a plugin. The most popular plugin is DuracellTomi’s Google Tag Manager for WordPress. It will automatically place GTM container snippets throughout your site – plus it supports multiple containers for complex tracking.
Migrating existing tracking tags into Google Tag Manager
Many analytics managers come to GTM because they’re tired of updating tags manually. Migrating tags to GTM will save a lot of time and resources in the long run, but you’ll want to make sure you don’t leave a gap in your measurements during the process. At the same time, you shouldn’t install GTM on your site while your other tracking code is active, or you’ll end up with skewed data as each tag gets tracked twice.
To avoid the risk of data redundancy and ensure a smooth transition to GTM, follow these steps:
1. Document all of your site pages containing tracking code, such as Google Ads conversion tracking.
2. Document all events and conversion trackers.
3. Re-create all events as triggered tags in GTM.
4. Test your new container in Preview Mode.
5. Remove all (non-GTM) tracking code from your site.
6. Publish your container.
Advanced tips
If you’ve followed the guide above, you’ve gained experience with all of the basic elements of GTM. You can create tags with variable-dependent triggers and publish containers to your site. If you keep playing around with these elements, you’ll likely discover new ways to finely tune your tracking data.
Once you feel comfortable within the GTM workspace, check out these advanced user tips:
Using data layer variables
When GTM ‘reads’ through a webpage, it looks for variables that will cause tags to trigger. However, the process of parsing through site HTML requires resources, and that introduces a cost – typically slower loading times. If your tag is looking for multiple trigger variables, lag can become a significant factor.
To overcome this challenge, you can deploy a data layer alongside your GTM snippet. A data layer is a JavaScript object that passes information from your site to your GTM container. It looks like this:![]()
This example shows that the page is categorized as a signup page, and the visitor is a high-value customer:
Essentially, a data layer places a keyed dictionary on each page. The data layer snippet should always appear on the page <head> element above the container snippet.
To access the keys in your data layers as variables in GTM, follow these steps:
1. From your workspace, go to Variables > New > Variable Configuration > Data Layer Variable.
2. In the “Data Layer Variable Name” field, type the key exactly as it appears in the code. For example, ‘pageCategory.’
3. Click “Save.” You can now access these variables in GTM. But remember, these work on a per-page basis. If you want data layer variables to pass between pages, you’ll need to add code to handle that functionality.
Extend Google Tag Manager with the REST API
Google provides a REST API for developers to build apps on top of GTM. The actual setup of a program that accesses GTM through its API is beyond the scope of this guide, but we did want to note its existence for power users who want to use the platform with more sophistication.
For example, developers may want the ability to branch and merge container versions. Or they could write a script to modify trigger conditions for multiple tags. The flexibility of the API makes it possible to create a wide variety of apps.
Scale enterprise-level QA testing
If your development workflow uses multiple environments on separate servers, you can define each environment and push different container versions to each one. For instance, you could test a new container on a development server before pushing it to the production server. Access this option from Admin > Environments.
The more you use GTM, the more you’ll find to love about it. The ability to manage all of your tracking tags from a single dashboard means you can start getting actionable insights from your data faster. And the ability to do all this with minimal coding means you can get everything up and running in short order.